Oculus Quest VR: Tricks And Hacks Guide

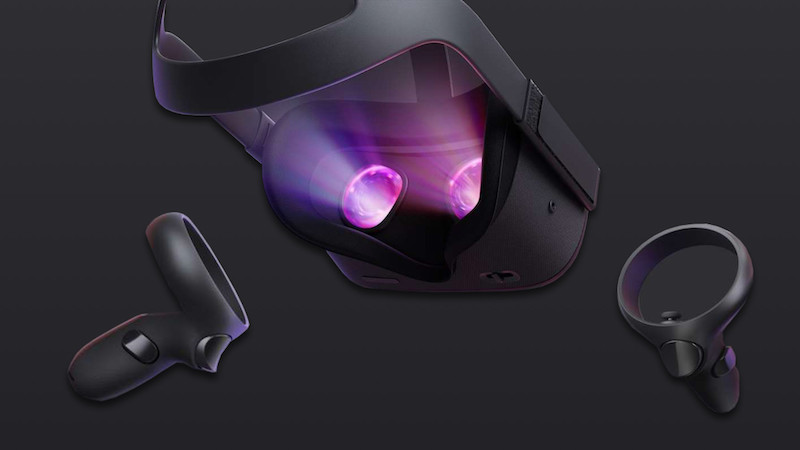
The Oculus Quest is the first all-in-one gaming VR headset offering high-resolution graphics. It comes with advanced 3D motion controllers, it doesn’t require external sensors and allows for a huge guardian area for an unparalleled VR experience.

By now you likely already know that Oculus Quest is amazing right out of the box…
But what most people don’t realize is that it can do so much more. In this guide, we’ll show you all the undocumented tricks and hacks to push your VR experience even further than ever before. This includes (but not limited to) how to get better image quality, how to run third-party software and increase (by almost double) your battery life while improving headset comfort.
Oculus Quest Setup
If you’ve already completed the setup of the Oculus, then skip this section using the table of content above.
Otherwise, we’ll go through a 60 second setup guide to get you going properly (and avoiding common mistakes). This will help improve the comfort of the headset on your head and will prolong it’s life.
Two Things You Should Never Do
There are two things you NEED to know about the Oculus Quest:
1. That the lenses are very sensitive to light (and putting it in the sun can damage your device)
2. The Oculus comes with a free headset cover. Don’t throw it away.
When removing your Quest headset from its box for the first time, you’ll notice a cardboard cover over the lenses (with instructions to download the Oculus app). While it’s made out of cardboard, you can use this as a free lens cover.
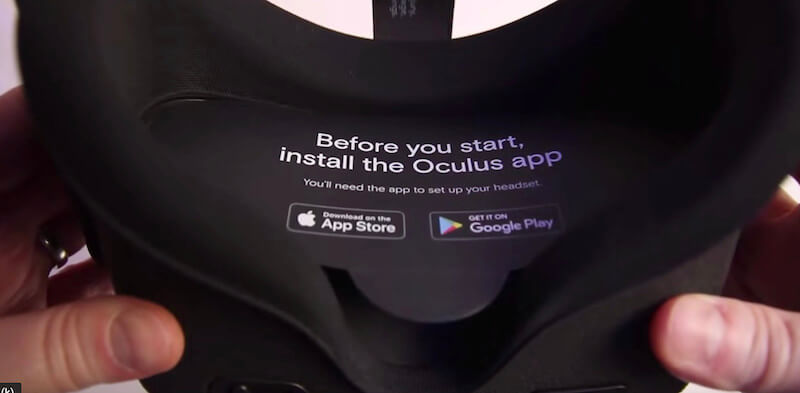
The reason you might want to use a lens cover when you aren’t using the Oculus Quest is because the lenses are like magnifying glasses that intensify rays of sunlight, which ultimately will burn pixels into the screen within seconds.
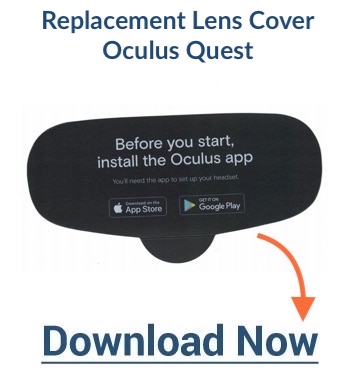
If you already threw the cardboard piece out, don’t worry, we have a free replacement for you.
60 Second Software Setup
Alright, now you’re ready to jump in and configure everything.
Here’s how to do it!
- Remove the headset, controllers and all other contents from the box.
- Download the Oculus VR App on either you Android phone or iPhone.
- Create an account or use an existing account (you can use your existing Facebook account).
- Adjust your privacy settings based on your requirements and tap next.
- Add a payment method (we can add this at a later time).
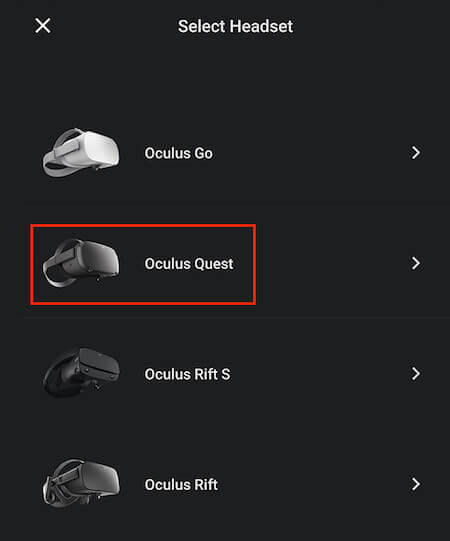
- Select a headset from the list provided.

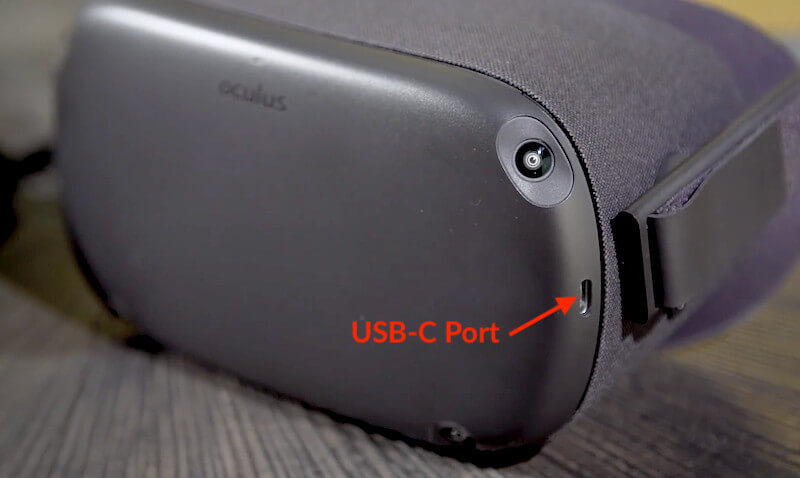
- Pair the phone to the headset by plugging the charger into the mains outlet and connect the cable to the USB-C port on the left side of your headset.

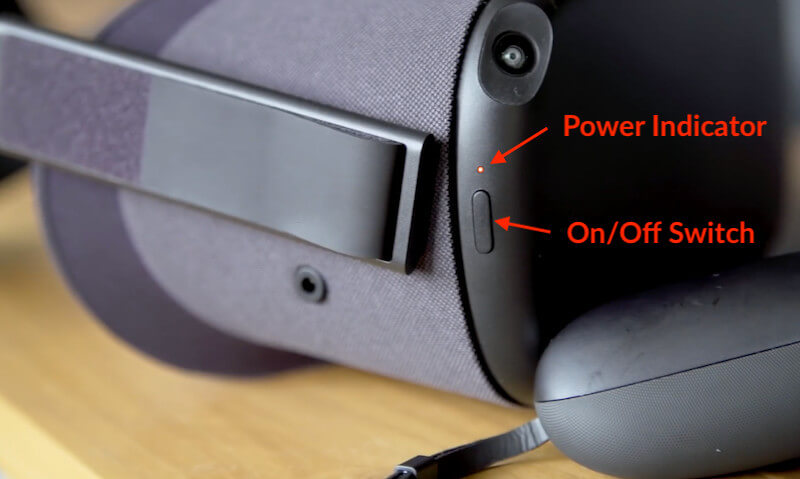
- On the right side of the headset check to see if the light indicator turns orange to confirm a connection.
- Turn on the headset by pressing and holding down the power button for two seconds (it’s next to the light indicator).

- Put on your headset and on the bottom right you will find a code.
- Punch in the code on the phone and wait a few seconds to allow the pairing process to take place.
- Next, select the WiFi connection you want to connect to.
- Insert AA batteries to the controllers and click next on your phone.
- Select your preferred language and click next.
- Acknowledge safety concerns and watch the video. (you’re forced to watch it until the end before the “Acknowledge” button appears – click it).
- Wait for the headset to update (you cannot purchase any games from the app store until your headset has updated).
- Put on the headset and set the boundaries of your play area by using the Oculus controllers.
Boom! You’re done. You should never have to set it up again (unless you reset it to factory settings).
You’re ready to enable the more advanced features on the Oculus Quest.
Where can I get a discounted Oculus Quest?
You can get a discounted Oculus Quest at a variety of retailers and save quite a bit of money on your purchase. In order to grab a discounted VR Oculus Quest headset, please check out our updated list of prices and online store locations. We constantly update our list with the best prices so that you can get the best deal possible.
Click here to go to the retailer with the current best price discount on the Oculus Quest.
Enabling Developer Mode On For Added Flexibility
You didn’t think we’d leave you with just a basic setup did you ?
If you’re going to be taking full advantage of the Oculus Quest, you’re going to need to enable developer mode. You’ll need it to load side apps and to connect to certain peripherals so we mind as well do it right now.
Here is how we enable developer mode on the Quest.
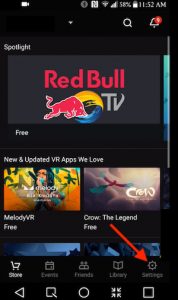
- Open your Oculus app on your mobile phone.
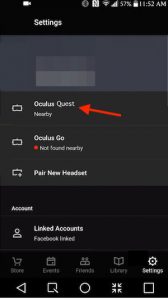
- Select “Settings” on the bottom right (gear icon).

- Select your headset (Oculus Quest) and wait a few seconds for it to connect.

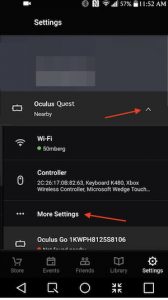
- After it connects, on the right hand side there is a down arrow. Click that to drop down the menu.
- Click “More Settings”.
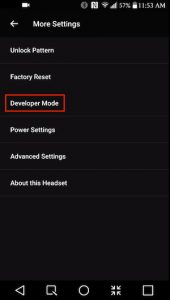
- Click “Developer Mode”.

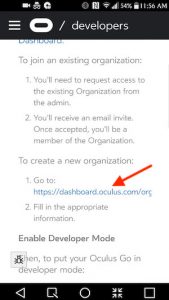
- Toggle the switch to turn it on. This will now take you to the Oculus developers webpage.


- Scroll down to where it says create a new organisation and click the link and login.

- Type in the name of your organization (what ever you want to call it) and click “Submit”.
- Agree to the terms.
- Repeat Steps 1 to 7 to enable developer mode.
Now that developer mode is enabled… you can pretty much do anything you want with the Quest without it bothering you. Let’s hop into adjusting the straps now.
Why oculus couldn’t just upgrade the rift with the same panel optics like quest?
They could have done it but they felt it wasn’t in their best interest.
Any other psvr owners gonna get the oculus quest day 1?
I will definitely get one, but I’m not sure if it will be day 1 or not.
I got a PSVR day one, and while I’m happy with it, I would have saved a ton of money had I waited a year for the price to drop.
I like to think that I’ll be able to resist buying a Quest until that price drops as well, but I don’t know if I have enough willpower to resist.
Would you pay more for 845 in oculus quest?
No, it wouldn’t fundamentally change the experience or games possible anyway.
Rec room port to oculus quest?
If rec room comes to quest i’ll get it!
What games would you be most excited to see on the oculus quest?
Pavlov vr with custom maps, Star trek bridge crew, Rec room, Beat saber with custom songs, Wands.
How To PROPERLY Adjust The Straps
The Quest headset is a solid bit of kit which reflects good quality build. However, that also means it has weight to it.
It’s heavier than the Oculus Go, so if you are used to that, you may find the Quest a little more awkward to navigate (at least to start with).
So here is how to adjust the straps and distribute the weight evenly to make it a more comfortable and enjoyable experience.
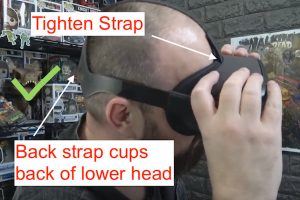
- Loosen the forward middle strap.
- Place the back strap so it cups the lower back of your head.
- Once the back strap is cupping the lower back of you head, tighten the forward strap to secure the position on the headset on your head.


- Loosen the side straps and pull them outwards (right angles and away from your headset). Once you feel a nice comfortable fit, fasten them in place by pulling them in.
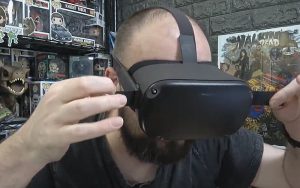

- Use your hands to adjust / tilt the headset (while it is strapped on) so that your forehead take most of the weight and not your cheeks.
Great, now that we’ve completed the setup of the Oculus Quest. Let’s load some applications on there!
Installing All The Apps You Could Ever Want
I sure hope you got the 128gb version because by the time you’re done with these tricks, you’re going to be installing more apps than you can handle! We’re going to cover how to (sometimes) get better prices off the official app store, how to load your own custom apps and how to use a side loader to install unofficial apps.
Make sure you enabled developer mode for this part.
Option #1 Easiest With SideQuest (Windows, Mac and Linux)
The SideQuest program used here works on Windows, Mac and Linux, giving everyone the opportunity to develop their own apps ready for sideloading onto your headset.
Note: These steps work for both the Oculus Quest & Go.
- Go to https://github.com/the-expanse/SideQuest.
- Click on “releases” for the latest releases.


- Select which operating system you are using, download it and put it on your desktop.


- Double click the downloaded file to install it on your machine.
- Once installed you will have a folder called “SideQuest” on your desktop. Open it.
- Run the application file by double clicking on it (the SideQuest icon).


- Once the program loads click on “Setup” on the bottom left-hand corner.
- [Step 1 On Screen] Create a new organization (if you have not already done so) by clicking the https://dashboard.oculus.com/organization link on the screen.
- [Step 2 On Screen] Download ADB drivers, these are needed to allow your machine and Oculus Quest to talk to each other.


- [Step 3 On Screen] Enable Developer Mode.
- [Step 4 On Screen] Connect your Oculus Quest to your Windows, Mac or Linux machine via USB cable.
- Put on your headset and you’ll see the “Allow USB Debugging” message. Click “Always Allow” & then click “OK”.
- Make sure everything is connected, confirmed by the green light.
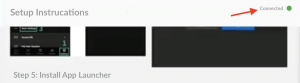

- [Step 5 On Screen] Click on “Install App Launcher” which side loads apps to your Oculus headset.
- From the side menu choose which App you would like. You have a choice of VR Games, VR Apps, Android Apps & more. Simple click on the “More” button, followed by the “Install” button and your app will automatically be side loaded on your Oculus headset.
For the full installation process of SideQuest watch this video:
Option #2 Manually Side Loading Onto The Oculus Quest
Most applications that work on Android (and especially Oculus Go) can be side loaded onto the Oculus Quest. While it’s not guaranteed that they will function properly, there’s a good chance that you’ll be able to use it from within the virtual reality environment.
Of course, it goes without saying that none of this is supported by Oculus and you’re on your own if things don’t work.
Before we even start, we’ll need some applications in the APK format to side load.
- The popular site www.apkmirror.com has quite a few.
- Alternatively, you might be able to capture the APK (more advanced) during an installation following this video:
Once you have the .apk file of the application you want to load, follow these steps required to side load applications:
- Enable Developer Mode on your Oculus Quest.
- Get the adbLink software from www.jocala.com You’ll be using it to load the applications.
- Launch adblink while your headset is connected to your computer. (If you’re using mac, you might need to download and enable Mac file transfer before performing this step by downloading the Mac) – Android tool here: www.android.com/filetransfer
- Accept the permissions in the Oculus Quest headset.
- Click on “Install APK” inside the adblink software. This will copy the APK over.
That’s it!
Your side loaded apps will appear in the Library / Unknown Sources. (And sometimes in the Oculus TV app under unknown sources)
How To (Sometimes) Get Quest Games For Cheaper
Depending on the game or software application, it might be available on more than one platform at the same time (Oculus Rift, Go, Gear, Quest).
While Oculus will try to force you to purchase an application from the proper store for your headset, you can sometimes find great deals while browsing different categories that have the same game / application for less.
For example, a game might be priced at $24.99 in the Quest section of the Oculus store while the exact same game might be priced at $16.99 in the Rift section. If the game in the Rift store is listed as compatible with the Quest, then purchasing it there will also allow it to work on both platforms.
Be warned though, some games have specific store specific versions and if this is the case, then you MUST purchase the games in the correct store in order for it to work. (Superhot is a great example of this)
On the left, the application from the Rift store does NOT support the Quest (so don’t buy it). On the right, the application is supported both on the Rift and the Quest, so purchase it from the category that has the lowest price (in this case, the Rift Store).
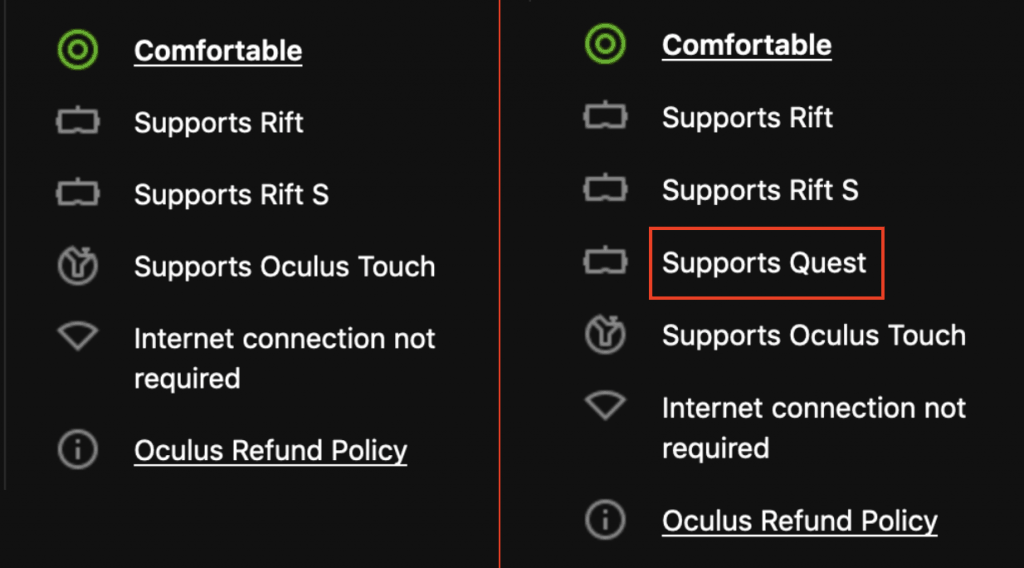
- Go to the official Oculus store using a computer.
- Compare prices between the “Rift” category and the “Quest” category. If the application name is the same AND *important* the Quest is listed as supported on the right hand box, then purchasing the application will work on both platforms.
Installing More Peripherals
The controllers that come with the Quest are GREAT… but sometimes you just want a keyboard or a mouse. While these aren’t officially supported, we’ll show you how you can connect them to your Oculus Quest.
Pairing Keyboards With Your Quest [On Windows]
Using a physical keyboard with a VR headset can be useful and time saving, particularly if using virtual desktops or surfing a browser.
It cuts out a lot of time compared to using the on-screen keyboard with a controller.
In these steps we show you how to pair your bluetooth keyboard to your Oculus Quest while always being able to access your bluetooth setting quickly and permanently.
- Before starting, your Oculus Quest must be in Developer Mode.
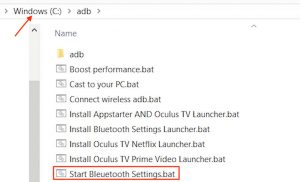
- Download this adb package on your PC.
- Move the package on your C:\ drive (or the installer won’t work).
- Double click on “Start Bluetooth Settings Launcher.bat” and a pop-up message appears showing successful installation.

- Once installed, click on “Unknown Sources” and then “Bluetooth Settings”. Your bluetooth setting page will load up.


- Pair your keyboard to your headset.
The same process applies for bluetooth enabled mice.
Pairing Airpods With The Oculus Quest [On Windows]
The Oculus Quest has no independent audio system.
So how do you connect lightweight ear pieces like AirPods to your Quest headset easily and quickly?
This comes handy when playing games like Beat Saber when you’re relying on bass for your cues.
Here’s how to do it:
- Put your Quest into Developer Mode. If you’ve already done this, skip to Step 2.
- Go to https://forum.xda-developers.com/showthread.php?t=2588979 and download the latest version.
- Extract the file and double click on adb-setup.exe.
- A blue pop-up screen will appear asking:
“Do you want to install ADB and Fastboot? (Y/N)”
Type “Y” and hit “Enter” - Next question is:
“Install ADB system-wide? (Y/N)”
Type “Y” and hit “Enter” - Next question is:
“Do you want to install device drivers?” (Y/N)”
Type “Y” and hit “Enter” - A device driver pop-up will appear, click “Next” and wait for drivers to install.
- Connect your Quest VR set to your PC using the relevant cable.
- On your PC load up “Command Prompt” and type “adb devices”
- Go to https://app.box.com/s/rlthnyp1z5j4sd5nlq761tju65yyqkal and download the file.
- On your PC load up “Command Prompt” again and type “Settings_1.0.apk” (or the filename you just downloaded in Step 10).
Note: Make sure the location of your file matches that showing on command prompt. - Put on your headset and go to “TV”.
- Select “Settings”.
- Select “Bluetooth”.
- Turn Bluetooth off and then back on.
- Pull out your AirPods and the press the Bluetooth button until the white light comes on.
- Your AirPods will show up on your Bluetooth list, click on it.
- Wait until the pairing process takes place and they connect.
Transferring Files To The Headset From Windows PC
This task is relatively simple and straightforward to do, however, most people get thrown off because of forgetting one simple step.
So how can we transfer files from a PC to the Quest?
So you need your Oculus Quest username but are unsure what it is.
Here’s how you find it in next to no time at all.
- Place on your headset on your head.
- Take the USB cable that comes with your headset & plug the micro USB-C end into your headset, while plugging the other end of the cable to your PC.
- Your PC automatically recognizes your drive and a pop-up window will appear.
- Click on “VR-Headset” on the left-hand side to open up the folder.


- This is where some people get a little lost as the folder displays no information at all. Look into your headset and you will see a message displaying:
“Allow access to data. The connected device will be able to access files on this headset” - Click “Allow”
- Repeat Step 3. and you now have access to Internal shared storage by double clicking on it.
- You can now transfer files from your PC on to your headset and vice versa.


No-Hassle Streaming
If you’re looking to share the VR experience with others (or capture your favorite moments), you’ll want to enable streaming. Here’s how to do it:
Streaming To Your Phone & TV
We’re going to go over how to stream to your phone, the TV and finally, to Facebook, Youtube and Twitch.
The easiest thing to do is to stream directly to your phone.
To do so:
- Start the Oculus Quest
- Using your phone, click on the Oculus App
- Click on the casting symbol located on the top right of the main menu.
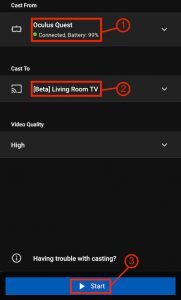
- Set the “Cast From” to your headset.
- Set the “Cast to” to your phone.Enjoy the streaming on your phone!Alternatively, if you want to stream to a nearby television, you’ll need a Chromecast device. Install the Chromecast device (3 or higher) on the television and then instead of setting the “Cast to” to your phone.
- Set the “Cast to” to your Chromecast connected to the television.
Great! Now you’re streaming the content wirelessly to your television.
Streaming To Facebook, Youtube & Twitch
If you want to stream to the internet, (Facebook, Youtube and / or Twitch), you’ll need two more pieces of hardware and a computer.
The total shopping list that you’ll need:
- Chromecast device.
- 2 HDMI cables (minimum, 3 if you want to hook it up to the TV as well).
- An HDCP stripper / HDMI splitter box.
- A streaming input card that supports HDMI.
Once you have the hardware, the set up is relatively simple. You stream the content to the Chromecast in the exact same way as before EXCEPT that you’ll be sending the signal through to the input card on your computer (and passing through the HDCP stripper at the same time).
Once the signal is on your computer, you can stream it to any service using OBS studio just like you would for any other stream.
Hardware Configuration:
- Plug the Chromecast into the HDCP stripper using an HDMI cable.
- Plug the HDCP stripper into the input card using another HDMI cable.
- Plug the input card into your computer (or use an internal input card/box).
Once set, here are the steps:
- Start the Oculus Quest.
- Using your phone, click on the Oculus App.
- Click on the casting symbol located on the top right of the main menu.


- Set the “Cast From” to your headset.
- Set the “Cast to” the Chromecast device.

- On your computer, install and run OBS Broadcaster from https://obsproject.com/
- Within the sources menu, click on the + sign and add the video source for your input card.
- Click on “Start Streaming” (and configure the streaming service of your choice: Youtube, Facebook or Twitch).
To embellish the stream, you might want to add a webcam as a source within OBS broadcaster so people can see you move as your navigate the VR world.
Advanced Oculus Quest Maintenance
While the Oculus Quest doesn’t require a ton of maintenance, it does require some. Unlike an Xbox controller that you can just throw around, you’ll have to be a bit more careful with the Quest because of the nature of lenses and optics. Let’s dive into how to clean it for the best image quality.

How To Clean Your Quest Headset For The Best Image Quality
Cleaning any product is not just about it looking nice and sparkly (although that is nice too). Cleanliness is about protecting your product and aiding in its longevity, and that is no different with the Oculus Quest.
One of the most important parts of your headset are the lenses. If these are dusty or smudged with greasy fingerprints, it severely compromises your image quality.
Here is the best way to clean the lenses (and other parts) of your Oculus Quest VR headset for improved image quality and gaming experience.
- Use a canister of compressed air to blow away any particles resting or stuck on the lenses (this is vital to prevent rubbing the dust particles against the lens glass in Step 2).
- Use a micro-fibre cloth and place it on the center of the lens and gently wipe in a circular motion moving outwards until smudges are removed (don’t apply liquids).
- For the front of the headset, use a damp cloth to wipe away dust and smudges.
- For the side and back straps, add a mild detergent to the damp cloth to remove any lingering bacteria that accumulates when in contact with your head.
- For the facepad:
a) Remove the facepad carefully.
b) Rinse under running water.
c) Apply mild detergent (preferably antibacterial) and use hands to clean the whole surface area.
d) Rinse thoroughly with water.
e) Use paper towels to dry off as much as possible.
f) Allow your facepad to air dry so it removes the moisture before reinserting. - For the controllers, use a lightly damp paper towel and wipe over the complete surface area.
- Then use the canister of compressed air to blow out any dirt or dust inside and around the analog stick and buttons.
Cleaning Tip: Keeping your Oculus Quest in a dry & cool place will reduce the quantity of moisture and dust accumulating, which will reduce how often you must clean it.
How To Maximize The Storage Available
Not being able to transfer files or download apps to your Quest headset might be the first signs you are running out of storage space.
If this is happening to you, it might be time to check how much space you have left.
Here’s what you do:
- Turn on your Oculus Quest headset and put it on.
- From the bottom toolbar menu, you will see “Settings”, select it.
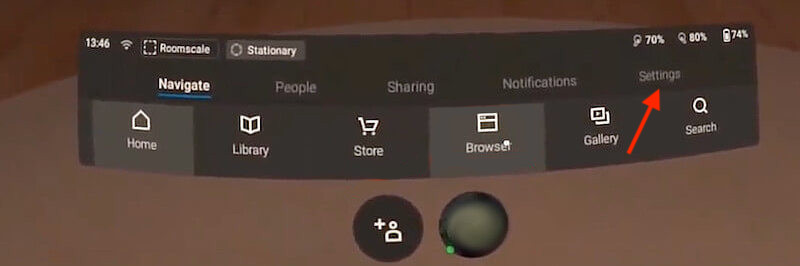

- Then select “See All”.
- Find “Storage Manager” from the Device tab to see how much storage is available for your VR headset.
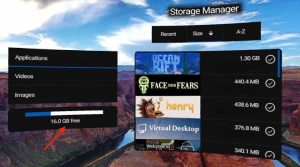

Storage Tips: At the moment the only way to provide available space is to uninstalling apps from your library to allow for new ones. However, do you know you can check how much space each apps takes before downloading?
Here’s how you do it.
- On your mobile phone open the Oculus app.
- Next, tap on “Store”.
- Find the content you would like to download and click.
- Scroll down to the bottom where information on the amount of space that’s needed to download the app is displayed.
Troubleshooting Issues On The Quest
Are you running into issues with the quest? Maybe the screen isn’t working properly or the thing is shutting down all the time? Let’s go over that.
How To Test For Dead Pixels
No brand new product is flawless. So it’s likely that some people have received their new Quest VR headsets (straight out of the box) with dead or stuck pixels.
Sometimes it’s not obvious that you have pixel flaws, and that’s why it’s a good idea to test this out right away. That way you can contact Oculus for a replacement headset sooner rather than later.
Jeremy Deats created a WebVR tool to help identify VR headset suffering from dead pixels, making the diagnosis process far easier and quicker.
Let’s look at how we can diagnose these dead pixels.
- Put on your headset.
- Select “Browser”
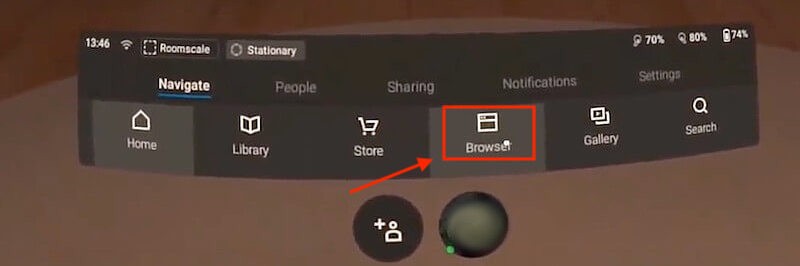
- Enter the web address immersha.com/webvr/vr-pixel-test.html which will take you straight to the WebVR experience.


- Select the headset icon at the bottom right of the screen to put the settings into WebVR mode.
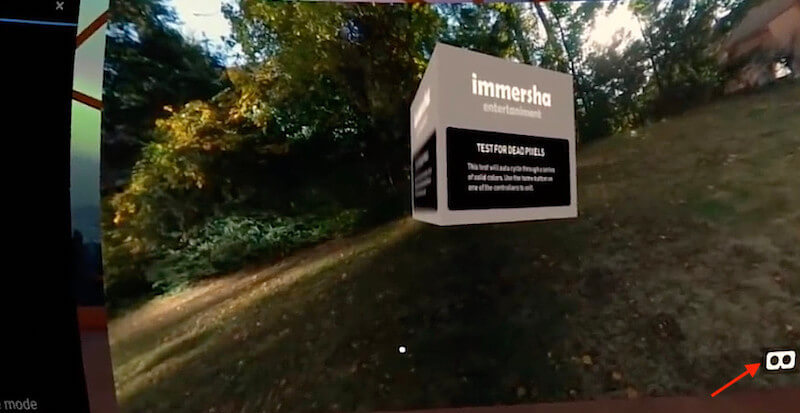

- Allow the tool to cycle through various colored screens.
- While this is happening, look straight into the lenses (no need to move your head around) and see if you can identify any pixels standing out.
Pixel Tip: The Oculus Quest has two screens (one for each eye), so if you identify a dead pixel be sure to close one eye and then the other to identify which screen the dead pixel is present. That way you can report it to Oculus.
Locating Your Oculus Quest Username
So you need your Oculus Quest username but are unsure what it is.
Here’s how you find it in next to no time at all.
- Put your Oculus Quest headset on.
- Go to “Oculus Home”.
- Click on your profile picture at the bottom.
- A new page will load with your username.
How to restart the initial Oculus Quest tutorial
The initial tutorial inside the Oculus Quest is amazing. What many people don’t know is that you can relive the experience or show someone else the tutorial for the first time by finding the “First Steps” application from within the Oculus library.
- Click on Library.
- Click on Tutorials.
- Click on First Steps.
There you go!
Now you can show someone else how to properly throw paper airplanes or balance a ping pong ball using the Oculus Quest.

 Improving Battery Life & Comfort On The Oculus Quest
The Oculus Quest has a battery life of around 2.5 hours which is pretty good. What if however, you can substantially increase battery life while making the top heavy headset more comfortable?
Here’s one way you can do it.
- Get a power bank (10,000mah) (the Topmate works well) which has two USB-A outputs and one USB-C.
- Purchase a case that holds the power bank nicely and snuggly.
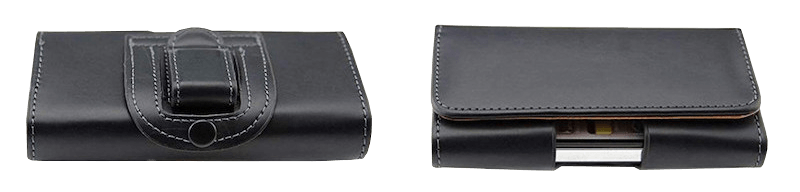

- Fix the double lock fixture of the case to the back strap of the headset (your top heavy VR set is now counterbalanced).
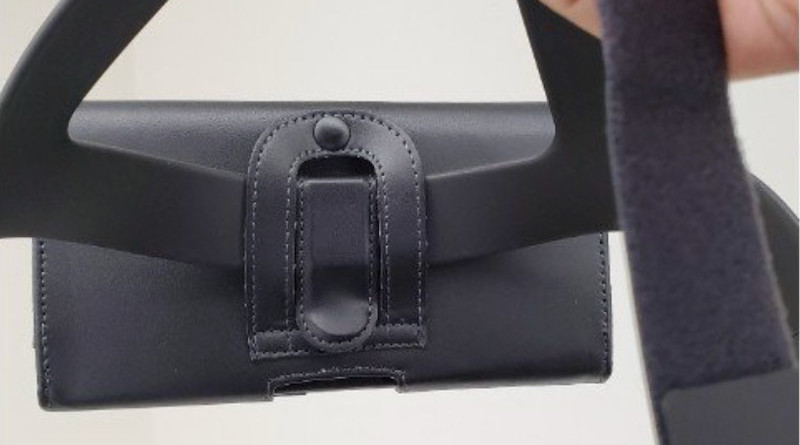
Note: This casing is not specifically designed to hold the this Topmate power bank. Therefore, the USB-C slot will be covered up or you can simply use the USB-A slot with a USB-C to USB-A male cable.
Pro Tip: Some charging cables will be too long and loosely hanging from your headset. However, if you find shorter ones (1 foot long), they may just that little bit too short. A solution would be to use an angled USB-C male to female adapter to provide a little extra extension with a snug hanging wire.
Links and resources
Want more? Here are some of the best resources. And if you have an HTC Vive, check out our massive HTC Vive Tricks and Hacks guide.
- http://www.reddit.com/r/oculus_quest/ Sub-Reddit dedicated to the Oculus Quest.
- http://www.reddit.com/r/oculus/ Sub-Reddit about the Oculus Rift and Oculus Quest.
- https://www.reddit.com/r/vive_vr/ A community for VR enthusiasts.
- https://github.com/the-expanse/SideQuest The SideQuest software (easiest way to sideload apps)
- List of community approved sideloaded apps that work on the Quest
- http://www.sideloadvr.com Sideload VR homepage for third party VR applications
Please take a second and rate this guide. We allow 1 Vote Per IP. Thank you!